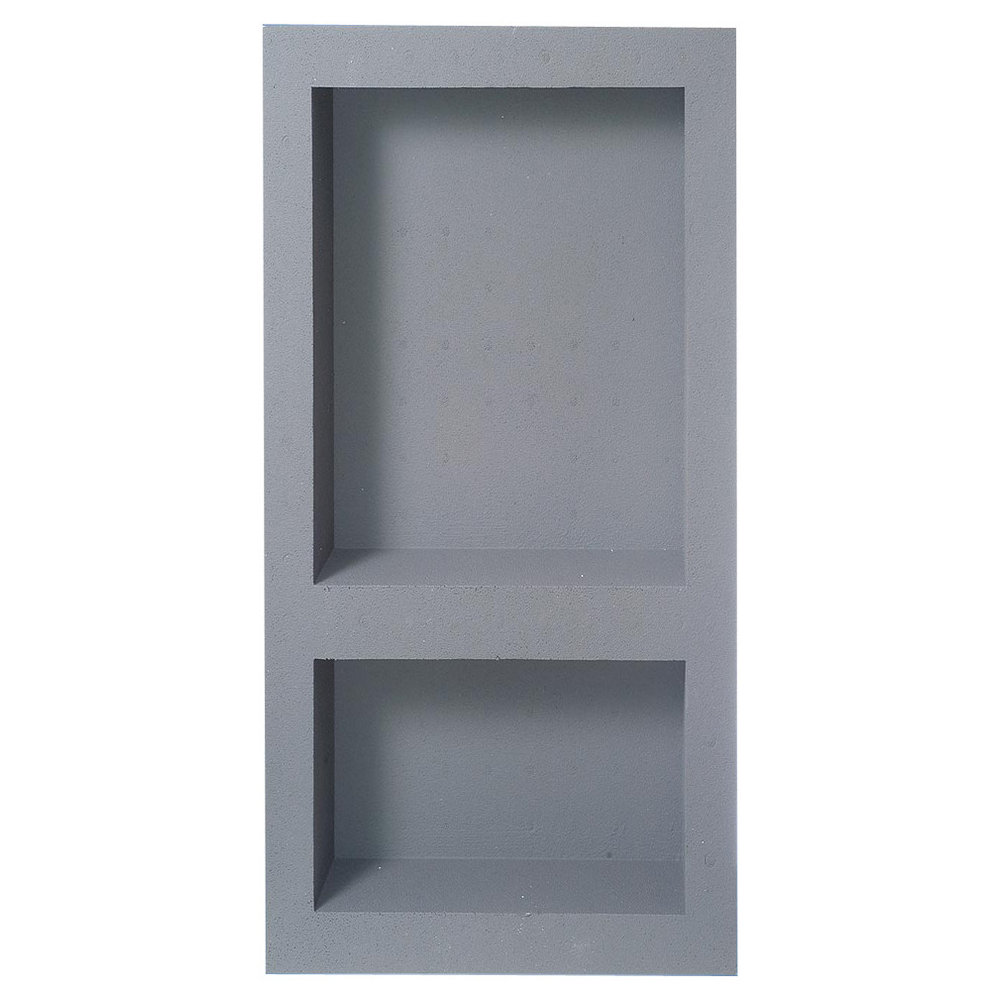
PreFormed Ready to Tile Narrow Combo Recess 9 x 20 Best Ready to tile niches in the market made of 2 lb high density compressed Styrofoam Niches are coasted with Poly Prep a One-Component Bonding Cement and Primer For EPS Architectural Foam and protect with liquid waterproofing membranes Approx pre-finished dimension Overall 10″ x 21″ depth = 4 1/2″ Front net 8″ x 6″ and 8″ x 12″ x 3 1/2 Depth Can be use any side We stock the largest size selection in the US In stock – Ship Same Day 2 lb high density compressed Styrofoam PreFormed?? Niches… Anywhere you want to store, display… bath, kitchen, hall or exterior wall. PreFormed?? Niches are amazingly versatile. Easy to install and ready to tile in minutes, not hours. PreFormed Niches feature in-wall construction. This unique design allows you to tile with the same tile as the surrounding walls. PreFormed?? Niches are a one-piece construction, and waterproof. Guaranteed to never rot, degrade, or leak. Their insulative factor does not promote condensation in the wall cavity. Easy, Waterproof, Worry Free. The difference is CLEAR. The “Anywhere” Solution Installation Two Substrate Layers PreFormed Niches, preformed Recess, shower shelves, PreFormed Shower Pan, PreFormed Shower Slope, Shower System, PreFormed curb Draw level pencil line on outside substrate layer. Place bottom of niche centered on the line and trace outline of niche back. PreFormed Niches, preformed Recess, shower shelves, PreFormed Shower Pan, PreFormed Shower Slope, Shower System, PreFormed curb Cut through both layers along line and remove panel. Place niche into opening. PreFormed Niches, preformed Recess, shower shelves, PreFormed Shower Pan, PreFormed Shower Slope, Shower System, PreFormed curb Remove niche, cut through outside layer only and remove “picture frame” outline. Set in place using Latex Polymer Liquid Waterproof Membrane or Silicon. Installation One Substrate Layer Draw level pencil line on outside substrate layer. Place niche centered on the level line. Trace exterior Recess. Cut along line and remove panel. Caulk to cross bracing studs using Latex Polymer Liquid Waterproof Membrane or Silicon. Installation: New Construction Installing into 2? x 4? stud wall Position Niche and mark the top and bottom of Niche between two studs (located 16? O.C.) Nail two horizontal braces between vertical studs. Use a 100% silicone sealant to adhere Niche to back wall and/or studs. Caulk to cross bracing studs using latex Polymer Liquid Waterproof Membrane or 100% silicone sealant. Seal joints between Niche and backer board using 100% silicone sealant, Silicone should not be smeared over the face of the Niche or backer board. Install cement backer board around and flush with the niche. Cover the joint and seal all edges between the niche and the backer board with fiberglass mesh embedded in latex polymer liquid waterproof membrane or 100% silicone sealant. Allow Silicon latex polymer liquid waterproof membrane to cure ???dry to the touch? before installing tile
Related products

$41.00

$41.00

$41.00

$41.00

$41.00

$41.00

$41.00

$41.00